3. Mix Image to Video Creation
1 Introduction
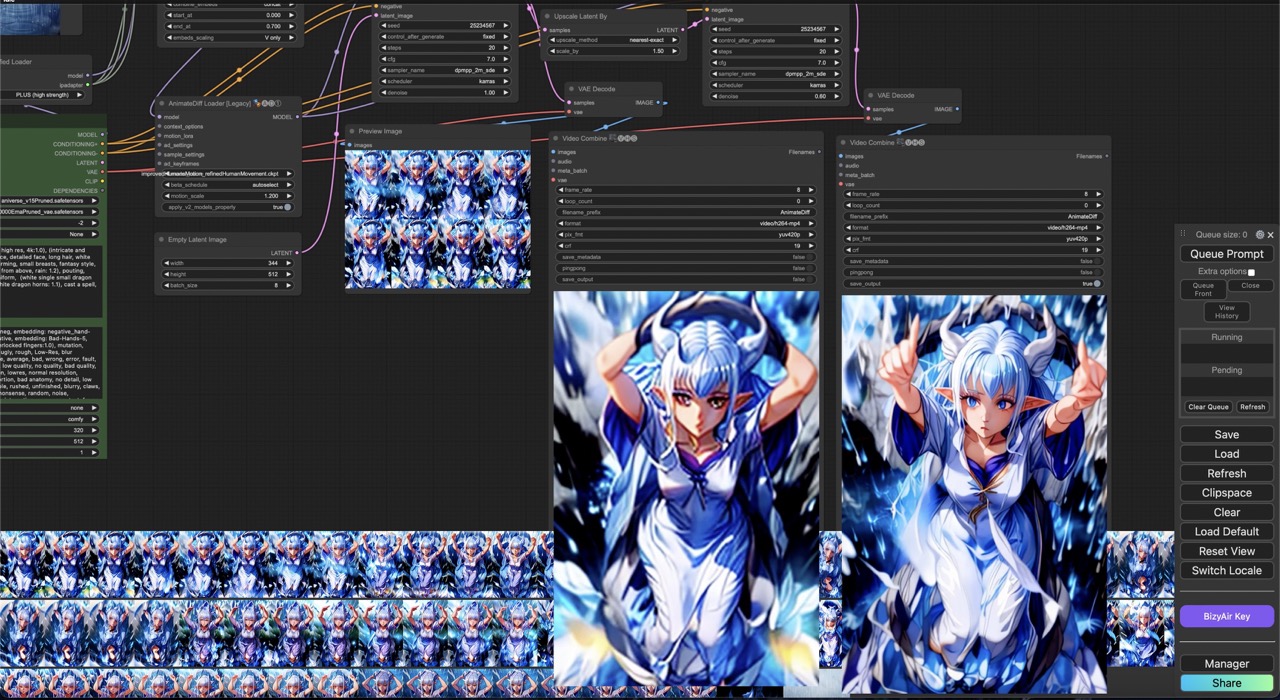
In this workflow, we combine three different images: a girl, rain, and blue flame, filter the content through a Mask, and use IPAdapter combined with AnimateDiff to create an animation of a dragon girl casting a spell in the rain. This workflow demonstrates how changing the motion scale affects the movement of different elements in the scene.
For example, at a lower motion scale of 0.8, the rain and fire elements remain static, while at a higher scale of 1.4, the background becomes distorted, intensifying the animation.
The complete workflow file can be found below for reference, and it can be imported into ComfyUI for further adjustments.
Download the workflow JSON file
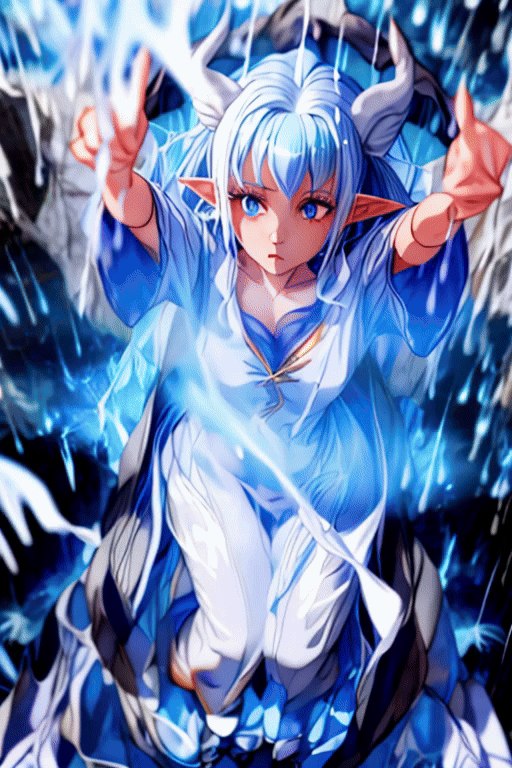
- Casting Spell Animation Output1:
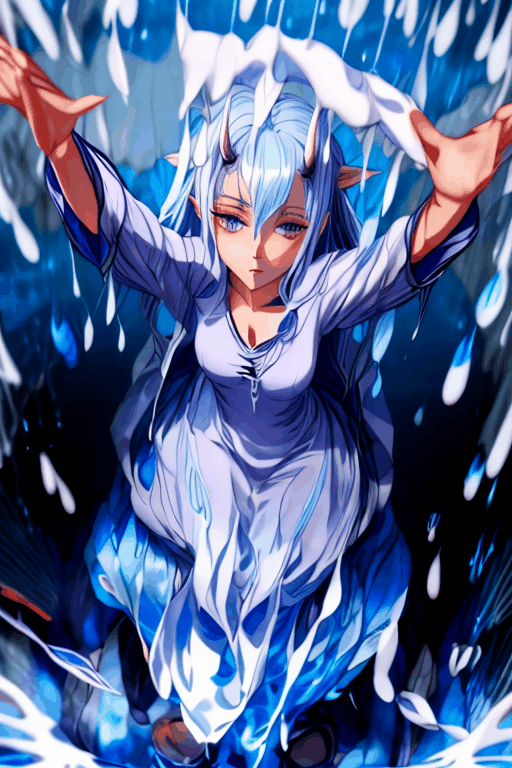
- Casting Spell Animation Output2:
2 Motion Scale Examples
The following examples show how different motion scales impact the animation:
Motion Scale 0.8: The rain and fire remain static. This scale is suitable for less dynamic movement scenes.
Motion Scale 0.8 Motion Scale 1.4: This introduces background distortion, adding a more dynamic and intense movement.
Motion Scale 1.4
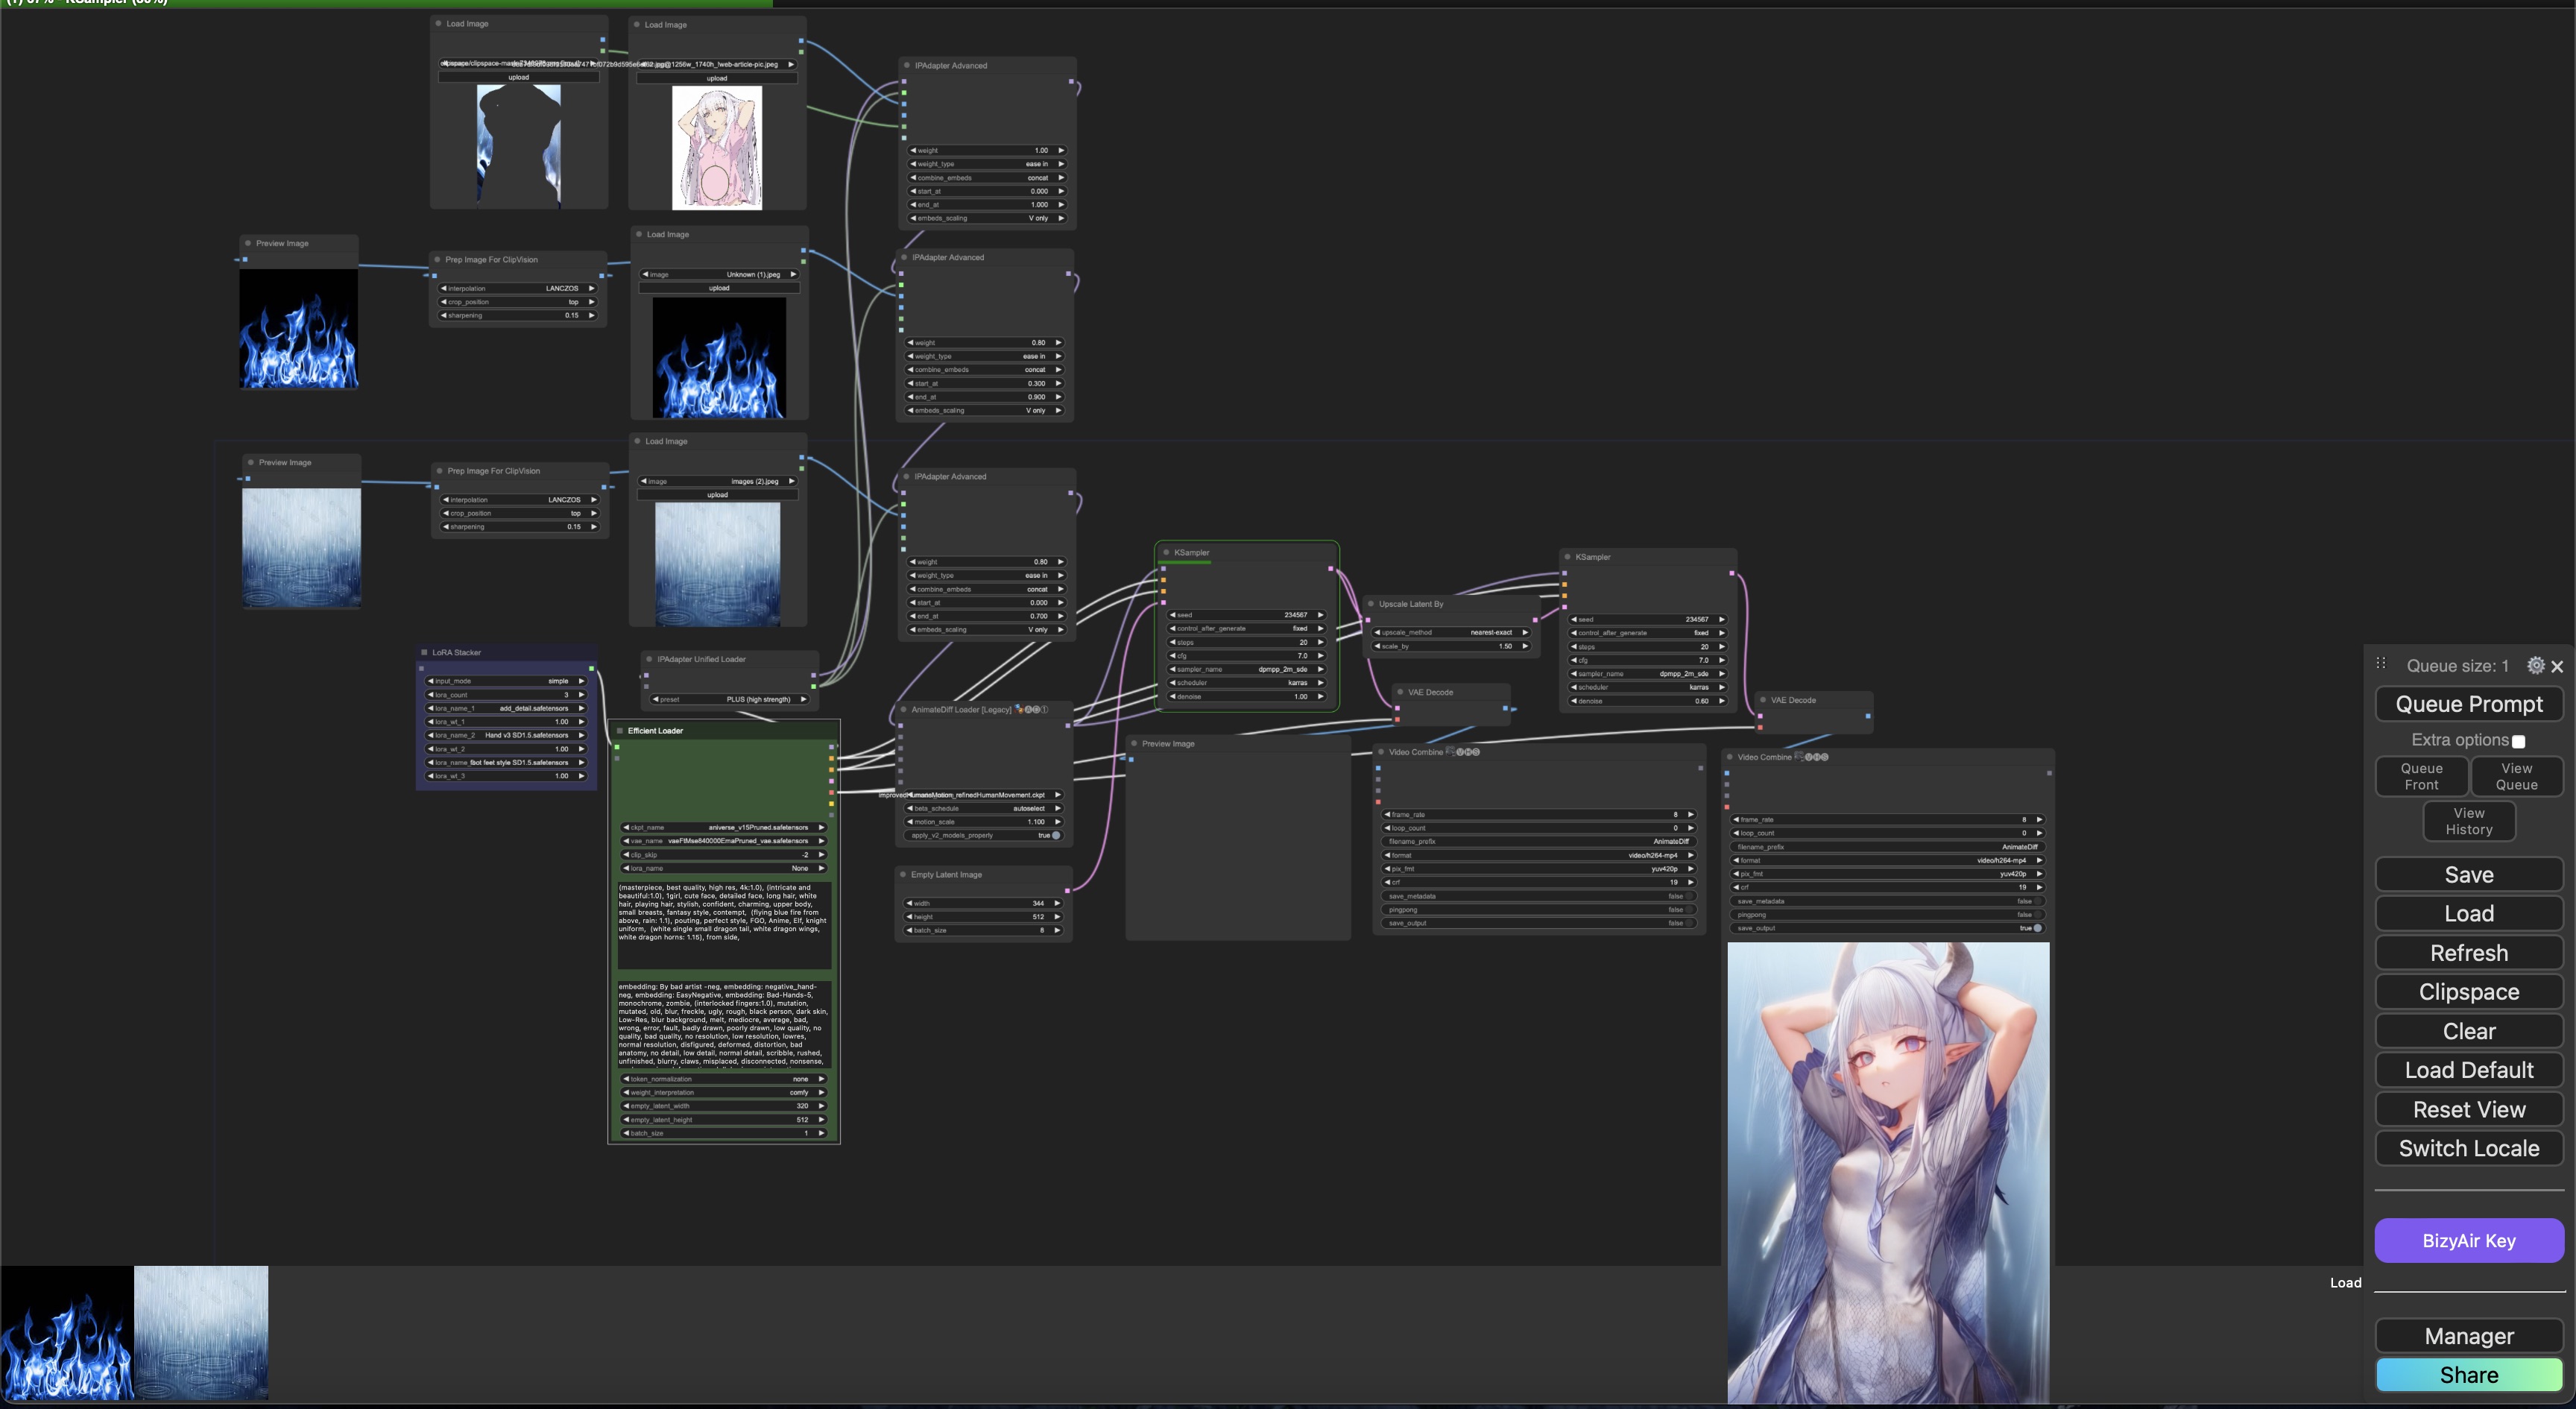
3 Workflow Overview
- Workflow Setup:
3.1 Step 1: Image Selection
Start by providing both positive and negative keywords that describe the video you wish to create. Select the three primary images: the girl, rain, and blue flame, that will be used in the animation.
- Three primary images:
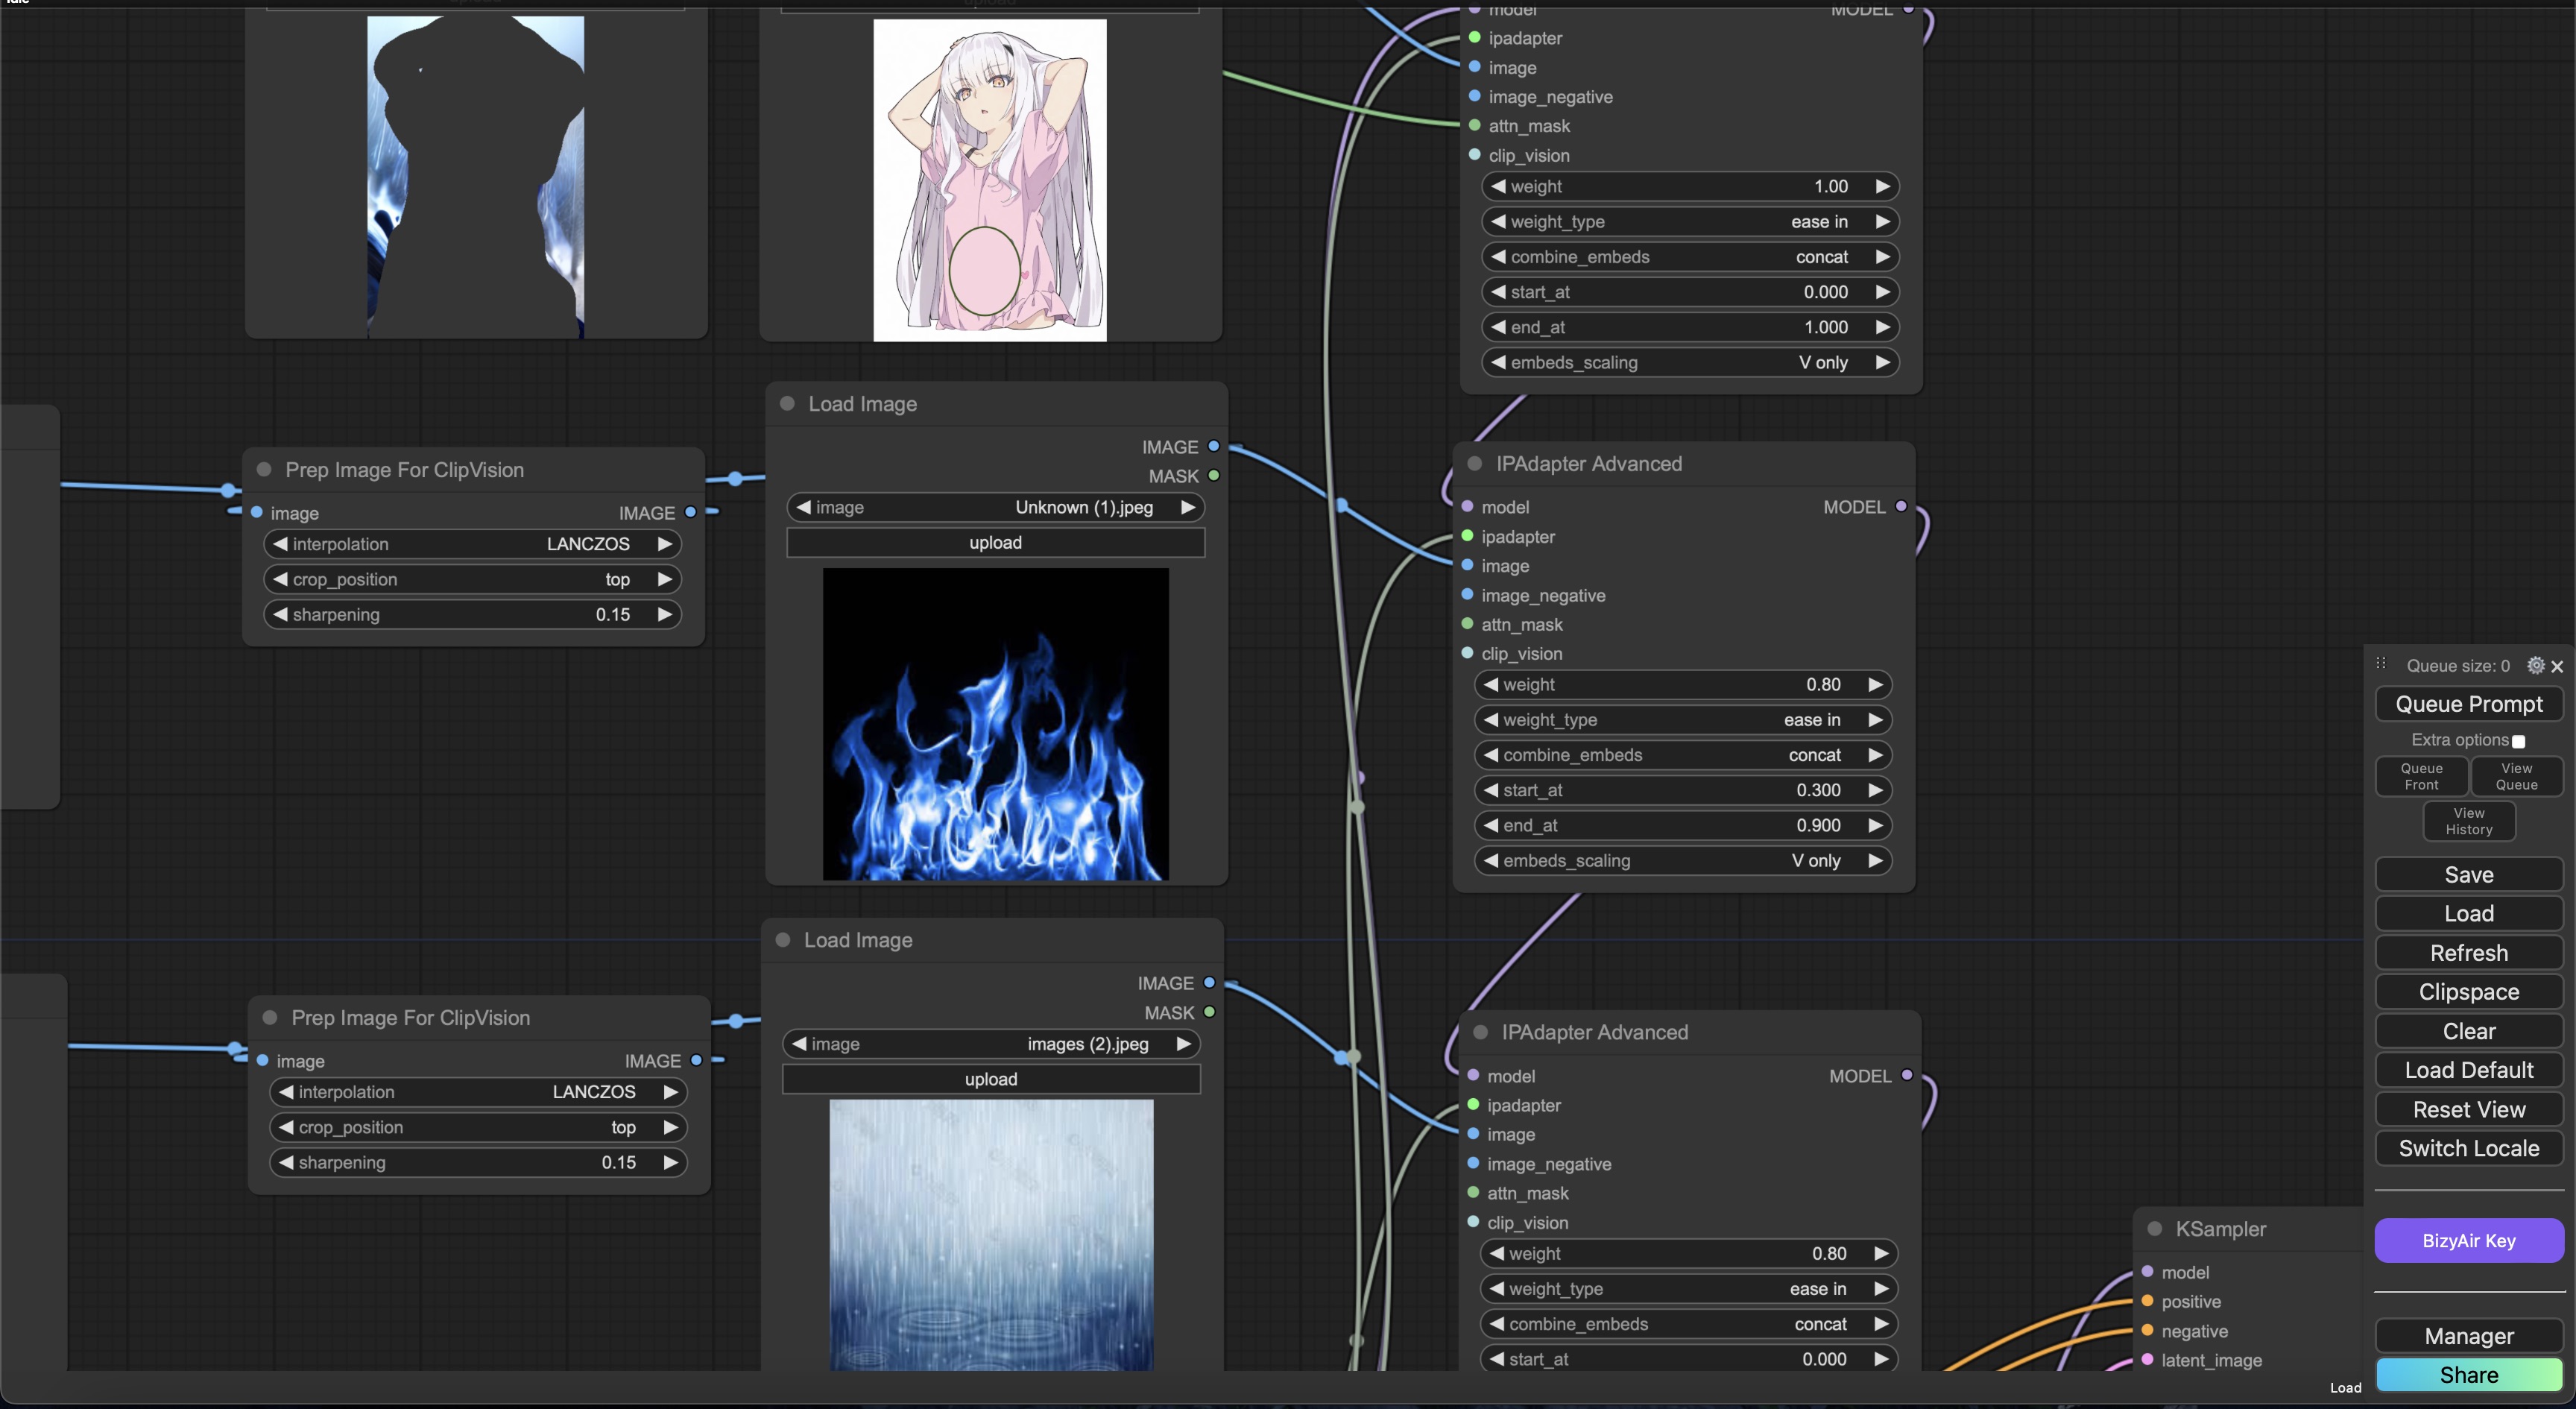
3.2 Step 2: Create Mask
Apply a Mask to filter the necessary elements of each image for precise animation control. In this workflow, the mask is used to isolate and control different parts of the image, such as the background and the character, to allow for distinct animation effects.
Creating the Mask: After generating the initial image, the mask is created by removing or painting over the areas where the character is present. This involves erasing or blacking out the parts of the image where the character appears. By doing so, the remaining elements (such as the rain and fire) can be controlled separately in the animation, while the masked-out character remains unaffected. This mask ensures that only the intended elements are animated, adding precision to the final video.
Mask Example:
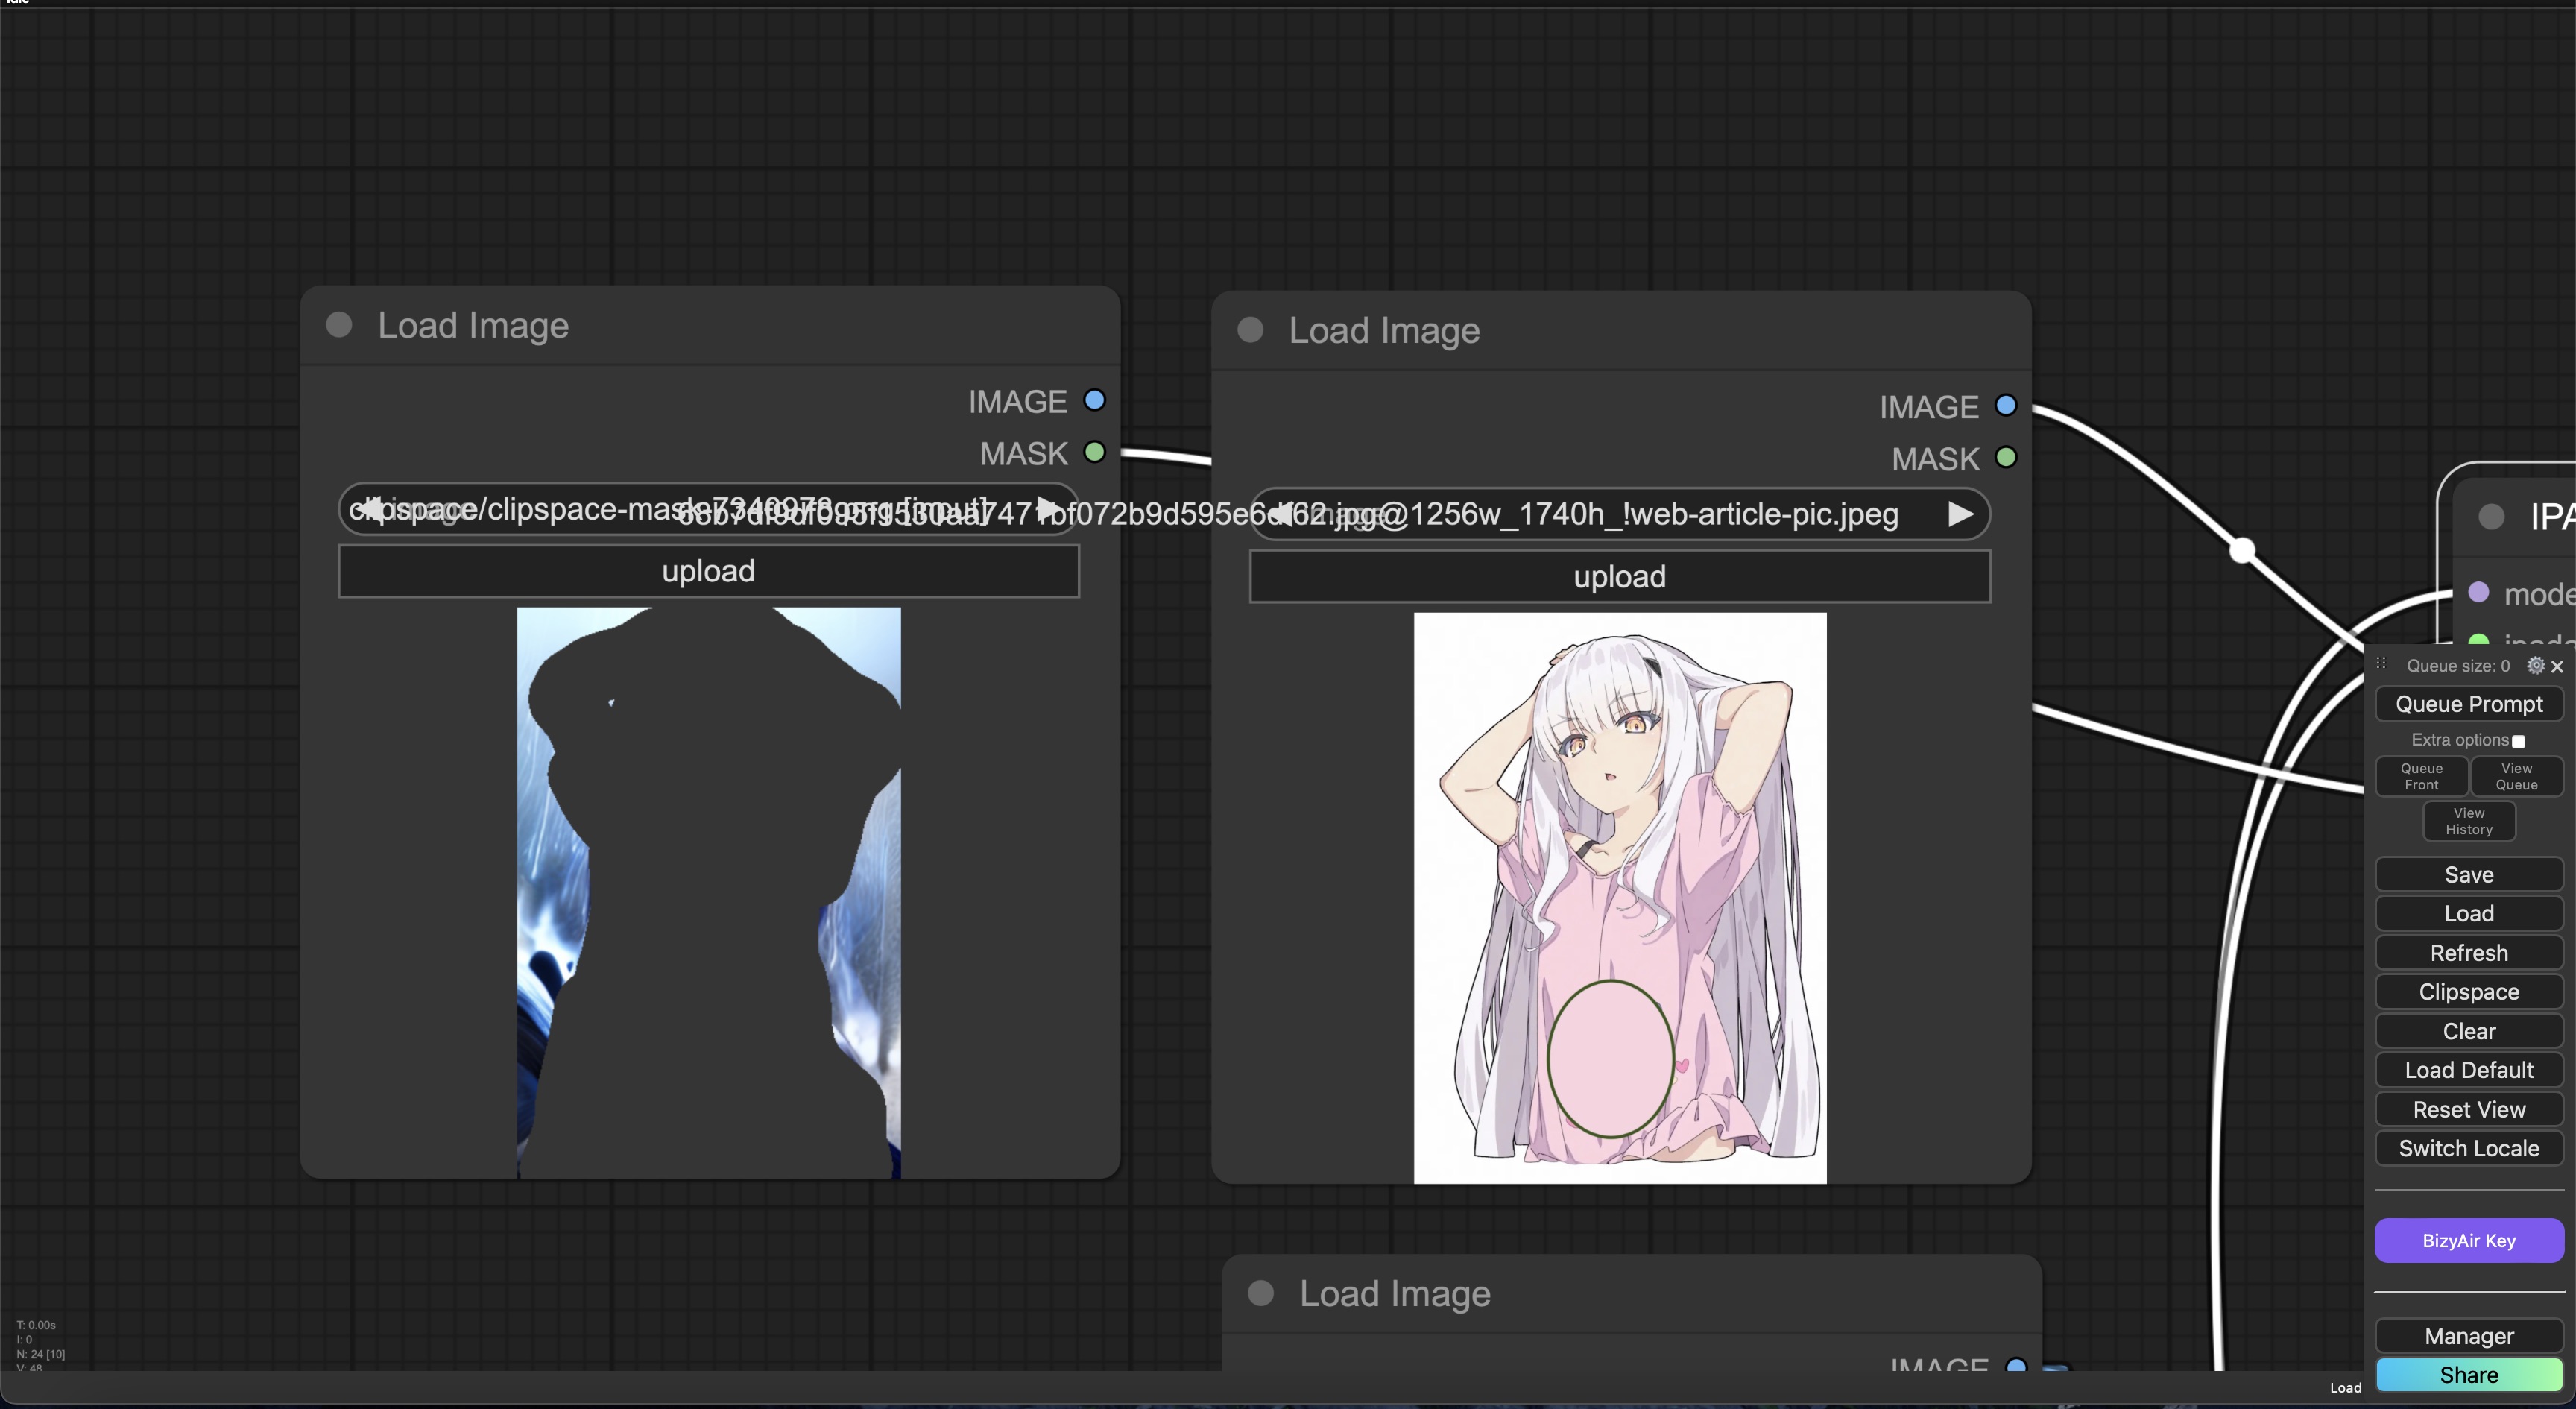
This approach provides greater flexibility in fine-tuning the animation, allowing you to focus on specific elements while maintaining control over the overall scene.
3.3 Step 3: IPAdapter and AnimateDiff Configuration
In the IPAdapter here, you can change the weight and weight type of each image, and set the time points when they appear in the animation. For example, in this workflow, the weight type of the images is set to ease in, which allows for a smooth transition at the beginning of the animation.
At the same time, the appearance time of the flame is set between 0.3 and 0.9 of the overall animation duration, which makes the flame appear in the middle of the sequence, creating the effect of casting a fire spell. This configuration helps to synchronize the animation’s visual elements for a more dynamic and immersive result.
3.4 Step 4: Motion Scale and Batch Size Configuration
Adjusting the motion scale and batch size parameters allows fine-tuning of the animation. The motion scale directly impacts how much movement or distortion is applied to the elements in the scene, while the batch size controls the number of frames rendered simultaneously.
Motion Scale: As the motion scale increases, the intensity of the animation also increases. For example, at a lower motion scale (e.g., 0.8), elements like rain and fire remain mostly static, adding subtle animation to the scene. As the motion scale increases (e.g., 1.4), these elements begin to move more dynamically, with greater intensity, and the background may become distorted, creating a more dramatic effect. This allows you to control the level of action or motion depending on your desired output.
Batch Size: The batch size parameter determines how many frames are rendered in each pass. In this workflow, it also dictates the total number of frames in the animation. A larger batch size results in more frames being generated at once, which can be helpful for smoother animation but may increase memory consumption. Conversely, a smaller batch size can reduce memory load but might produce a more segmented animation. In this example, a batch size of 16 was used to balance performance and smoothness.
Motion Scale & Batch Size Example:

By adjusting these parameters, you can fine-tune the movement and animation strength while managing performance and rendering time.
3.5 Step 5: Upscaling for Enhanced Quality
Use the Upscale process to improve the resolution and visual quality of the final animation.
- Before and After Upscale Comparison:
4 Conclusion
This workflow showcases the flexibility and power of combining IPAdapter with AnimateDiff to create dynamic animations by transitioning between multiple images with various motion scales and batch sizes. By fine-tuning parameters such as motion scale, batch size, and using masks, you can achieve precise control over different elements in the animation, such as the movement of rain and fire.
The results demonstrate that subtle changes in the motion scale can significantly impact the animation intensity, from static background elements to more dynamic and dramatic effects. This workflow is ideal for creating captivating visuals, especially when integrating multiple visual components like characters and environmental effects.
Experimenting with different configurations can help optimize both the visual output and performance, allowing you to create animations that align perfectly with your creative vision.